# 微信公众号网页授权
浅析微信支付系列已经更新三篇了哟~,没有看过的朋友们可以看一下哦。
[浅析微信支付:开发前的准备](https://mp.weixin.qq.com/s/mkxukWU4aMw92NxnL91dng)
[浅析微信支付:前篇大纲](https://mp.weixin.qq.com/s/pH0GGwUANJxJt-YHs6y_pQ)
[浅析微信支付:微信支付简单介绍(小程序、公众号、App、H5)](https://mp.weixin.qq.com/s/h9Mx4IBik0MLKSj4c_Qolg)
#### 1、开发前的准备
首先,如果没有看过本系列 `浅析微信支付:开发前的准备` 的朋友需要看一下这篇文章,链接在上方;本文需要用到开发前准备中的几个知识点:设置安全、设置白名单、得到公众号一系列信息(appid\apiKey等);如果需要在本地开发测试,还需要下载 `微信开发者工具`和 `微信公众平台接口测试帐号` 。
下面我们开始进入开发阶段。
#### 2、设置测试号相关信息
因为项目在开发阶段的时候,需要本地调试,所以需要使用测试号来验证代码是否正确,所以下面会讲如何设置测试号相关配置;
首先我们进入 [微信公众平台接口测试帐号申请](https://mp.weixin.qq.com/debug/cgi-bin/sandbox?t=sandbox/login) 页面,点击登录即可使用微信账号登录(一个微信号只有一个测试号)。
登录后可以进入测试号管理界面,如下:


按要求设置上方图片中的配置,即可减少80%的问题,如果调用时还有其他问题,请到文末添加作为微信,可进入讨论群和大家一起交流。
#### 3、获取微信网页授权
使用以下代码获取微信网页授权:
微信官方js文件:
```
```
封装的微信工具文件`weixin_util.js`:
```
```
调用微信config方法并获取网页授权:
```
```
如果访问页面路径,得到以下显示,就已经成功获取网页授权,其他均为失败: 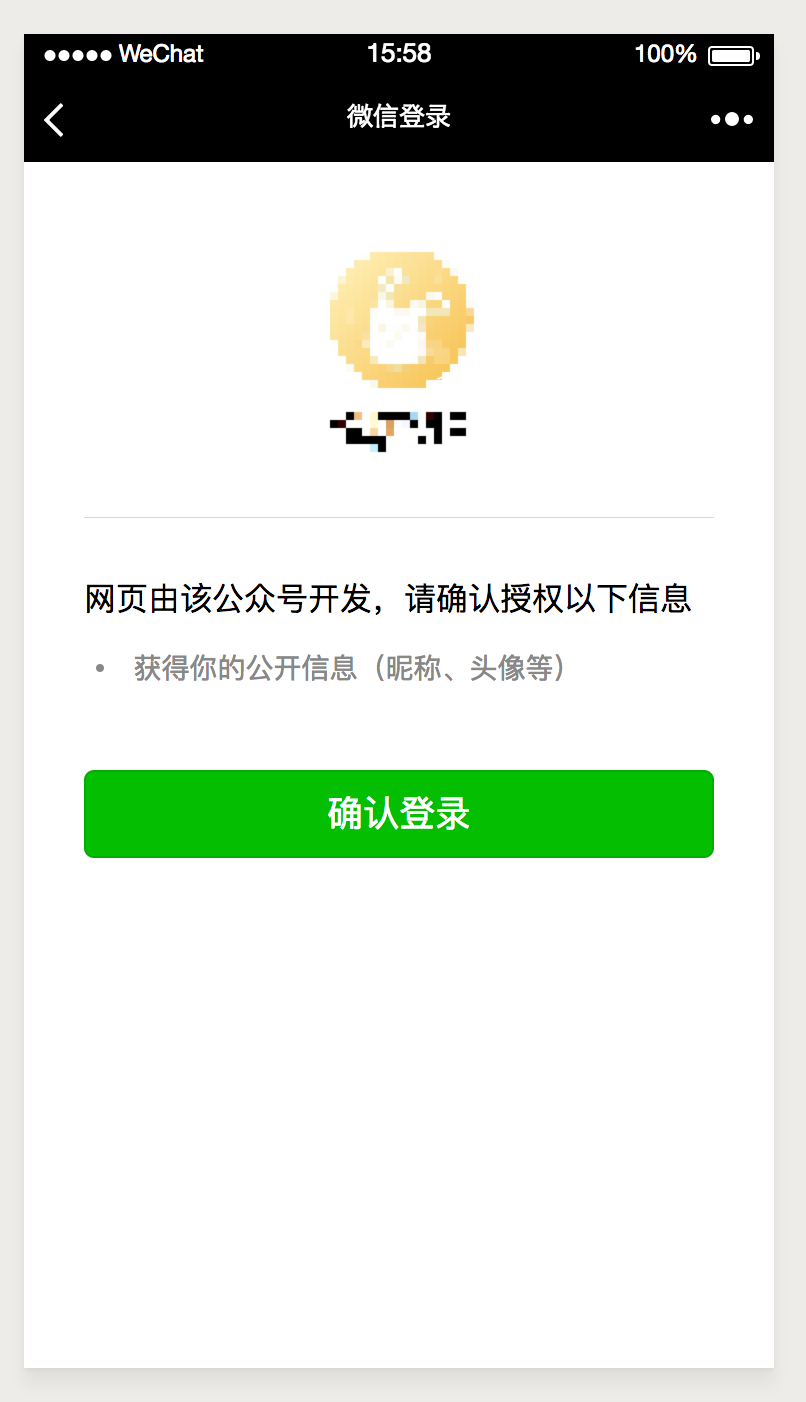
如果出现其他错误,需要检查一下第一步时设置的路径安全接口、域名是否正确,开启weixinConfig中的debug模式,看是否为没有正确设置功能模块;如果还不能解决,请到文末看楼主上一篇文章或者添加作者进群即可。
#### 4、获取微信用户信息
这里说一下上面获取用户授权的具体参数:
第一步,获取config需要的基础参数:
```
/**
* 根据appid获取wx.config需要的基础参数
* @param reqMap requestUrl 请求页面地址、appid appid
* @return json
*
* @author yclimb
* @date 2018/9/25
*/
@ApiOperation(value = "微信公众号|config需要的基础参数", httpMethod = "POST", notes = "config需要的基础参数")
@PostMapping("/getSignature")
public AppMessage getSignature(@RequestBody Map reqMap) {
Map map = Maps.newHashMap();
switch (reqMap.get("appid")) {
case WXPayConstants.APP_ID:
map = wxUtils.getSignature(reqMap.get("requestUrl"), reqMap.get("appid"), BaseConstants.WX_MINI_PROGRAM_YUEDIAN_CODE);
break;
case WXPayConstants.APP_ID_CHUNBO:
map = wxUtils.getSignature(reqMap.get("requestUrl"), reqMap.get("appid"), BaseConstants.WX_CHUNBO_JSAPI_YUEDIAN_CODE);
break;
}
return AppMessage.success(map);
}
```
第二部分:获取用户授权的基础信息:
```
// 这里的appid就是咋们测试号的appid
$appid="xxx";
// 这里的地址需要http://且必须encodeURI,此地址为获取用户信息后,微信自动转发的服务器端接口,用来接收微信的授权code,在后端处理而得到用户基本信息
$redirect_uri=encodeURI("http://127.0.0.1:8888/weixin/auth/authorize.do");
// 微信官方的授权接口
$url="https://open.weixin.qq.com/connect/oauth2/authorize?appid="+$appid+"&redirect_uri="+$redirect_uri+"&response_type=code&scope=snsapi_userinfo&state=" + state + "#wechat_redirect";
// state可以用来区分特殊参数和配置
```
具体可见微信官方文档,文档如下:[微信网页授权接口](https://mp.weixin.qq.com/wiki?t=resource/res_main\&id=mp1421140842)
以上为js页面处理,下面我们来具体讲解 redirect\_uri 这个接口中需要处理的逻辑;
`WXAuthController`:
```
/**
* 微信网页授权
* https://mp.weixin.qq.com/wiki?t=resource/res_main&id=mp1421140842
* 第一步:用户同意授权,获取code
* 第二步:通过code换取网页授权access_token
* @return str
*
* @author yclimb
* @date 2018/7/30
*/
@ApiOperation(value = "微信用户|网页授权", httpMethod = "GET", notes = "获取前端微信用户的网页授权,得到用户基础信息")
@GetMapping("/authorize")
public AppMessage authorize(HttpServletRequest request) {
// 跳转页面标识
String state = request.getParameter("state");
// 通过code获取access_token
String code = request.getParameter("code");
log.info("authorize:code:{}", code);
String appid;
String secret;
// 根据不同的state得到不同的微信公众号网页授权
switch (state) {
case STATE_ASYD:
appid = WXPayConstants.APP_ID_ASYD;
secret = WXPayConstants.SECRET_ASYD;
break;
default:
appid = WXPayConstants.APP_ID_CHUNBO;
secret = WXPayConstants.SECRET_CHUNBO;
break;
}
// 获取access_token和openid
JSONObject jsonToken = wxUtils.getJsapiAccessTokenByCode(code, appid, secret);
if (null == jsonToken) {
return AppMessage.error(-2);
}
return AppMessage.success(jsonToken);
}
```
`WXUtils`:
```
/**
* 网页授权获取用户信息时用于获取access_token以及openid
* 请求路径:https://api.weixin.qq.com/sns/oauth2/access_token?appid=APPID&secret=SECRET&code=CODE&grant_type=authorization_code(最后一个参数不变)
*
* @param code c
* @return access_token json obj
* @author yclimb
* @date 2018/7/30
*/
public JSONObject getJsapiAccessTokenByCode(String code, String appid, String secret) {
if (StringUtils.isBlank(code)) {
return null;
}
try {
// 获取access_token
String access_token_json = restTemplate.getForObject(WeChatURL.OAUTH_ACCESS_TOKEN_URL, String.class, appid, secret, code);
logger.info("getJsapiAccessTokenByCode:access_token_json:{}", access_token_json);
if (StringUtils.isBlank(access_token_json)) {
return null;
}
JSONObject jsonObject = JSON.parseObject(access_token_json);
if (StringUtils.isBlank(jsonObject.getString("access_token"))) {
return null;
}
return jsonObject;
} catch (Exception e) {
logger.error(e.getMessage(), e);
}
return null;
}
```
使用以上方法就可以得到微信用户的基础咯~,上面是作者已经封装好的sdk方法,具体的源码请见文末源码地址。
如果用户已经授权,第二次进入网页,这时候不需要再次授权,作者也提供了另一种获取用户信息的方法,通过access\_token和openid请求获取用户信息,代码如下:
```
/**
* 通过access_token和openid请求获取用户信息
* @return str
*
* @author yclimb
* @date 2018/9/17
*/
@ApiOperation(value = "微信用户|通过access_token和openid请求获取用户信息", httpMethod = "POST", notes = "通过access_token和openid请求获取用户信息")
@PostMapping("/getXxxUser/{access_token}/{openid}")
public AppMessage getXxxUser(@PathVariable String access_token, @PathVariable String openid) {
// 通过access_token和openid请求获取用户信息
JSONObject jsonUserinfo = wxUtils.getJsapiUserinfo(access_token, openid);
if (null == jsonUserinfo) {
return AppMessage.error(-2);
}
// 判断用户是否在悦店系统中是一个用户
String unionid = jsonUserinfo.getString("unionid");
if (StringUtils.isBlank(unionid)) {
return AppMessage.error(61008);
}
// 存储用户信息到数据库
// 用户名称解码
user.setNickName(UserNickUtil.decodeNickName(user.getNickName()));
return AppMessage.success(user);
}
```
#### 结语
根据以上步骤实现,就可以完成微信授权-用户信息获取等操作,如果有问题,欢迎小伙伴随时交流~
预告:下一篇文章,作者将讲 `统一下单接口`,敬请期待!!!
如果想要提前一览源码的小伙伴,可以先看看我的 github,地址如下: `https://github.com/YClimb/wxpay-sdk/blob/master/README.md`
加作者私人微信,作者微信号如下 `yclimb`,标明 `微信支付` 可拉入微信支付讨论群与小伙伴一起探讨哦,一定要标明 `微信支付` 哦~
到此本文就结束了,关注公众号查看更多推送!!!

---
# Agent Instructions: Querying This Documentation
If you need additional information that is not directly available in this page, you can query the documentation dynamically by asking a question.
Perform an HTTP GET request on the current page URL with the `ask` query parameter:
```
GET https://yclimb.gitbook.io/wxpay/pay/authorize.md?ask=
```
The question should be specific, self-contained, and written in natural language.
The response will contain a direct answer to the question and relevant excerpts and sources from the documentation.
Use this mechanism when the answer is not explicitly present in the current page, you need clarification or additional context, or you want to retrieve related documentation sections.